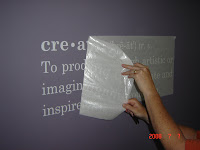
My DH Rod helped me with my first wall decor so that I could take step-by-step pictures of the process and let me tell you... it really is fast & easy to get these beautiful images on your walls! And, they look FABULOUS!
Step 1: Determine the perfect spot for your wall decor image. Take a damp cloth and wipe the area clean to remove any dust or particles that might create bumps in your working surface area. I let my area air dry.
Step 2: Measure your area from top to bottom and side-to-side to ensure your wall decor image is positioned exactly where you'd like it in your space (in case you are wondering... these are not my hairy arms. Rod loves to measure things & bascially didn't trust me to get this perfectly straight :o)
Step 3: On a flat surface / table, place your image facing down so that you see the back grid paper side and using the Decor Elements applicator (114285), lightly swipe over the image from the center to the outer edges. This will transfer the image from the backing sheet to the transfer sheet.
Step 4: Carefully & slowly peel the backing sheet off, working from one side to the other. Peel on an angle. As you are peeling the backing sheet off, make sure you are watching that your image is transferring properly to transfer sheet. HINT - if you order the 'Create' statement, the only thing I really had to watch for were the 'dots' or 'periods' as they were smaller images
Step 5: Gently place the image on the transfer sheet within your marked corners on your wall space (be careful not to touch the sticky part / image on the transfer sheet or let the sheet fold over onto itself). I used my hands to get the image/transfer sheet to get its initial stick, then grabbed my applicator tool and began running over the image to transfer it to the wall. I used light swipes from the center of the image to the outside edges again.
Step 6: Here comes the FUN part !! Carefully & slowly peel the transfer sheet off the image, pulling straight back at a bit of an angle if you can. Make sure that your image has transferred to the wall as you continue to pull the transfer sheet off. If any part of the image did not transfer, carefully replace the transfer sheet over the image again and rub until the image is completely adhered to the wall. If you've tried our rub ons on your cards &/or scrapbooking - it is essentially the same process for the home decor...just larger images!
Step 7: YOU'RE DONE ! I gently QC'd my work by ensuring every word was securely adhered to the wall & that there weren't any bubbles. Perhaps more needed for the word images, due to the amount of smaller 'individual' images (ie. the letters)
If you have any questions on this tutorial or wish to order your very own Decor Elements image for your special space - email me at lisaburns@rogers.com and I would be happy to help. I have a very special offer & gift for anyone that places their Home Decor Elements order with me by July 31, 2008! If you are on my customer email distribution list - watch for those special details coming to your inbox this weekend!!


1 comment:
Lovely ideas for home decoration, will certainly try them,
Post a Comment